Wednesday, August 26, 2009

BANANA CUPCAKE WITH FROSTING

I made these for a friend's birthday. I hardly ever use bananas in recipes but ever since I had a banana chocolate muffin I promised myself I would find a nice recipe for cupcakes.

Ingredients for 18 cupcakes:

  • 125 grams butter
  • 175 grams sugar
  • 2 eggs
  • 2 large mashed ripe bananas
  • 1 tsp baking soda
  • 2 tbsp boiling milk
  • 1 tsp baking power
  • 225 grams all-purpose flour

Steps:

  • Preheat oven to 170°C
  • Cream butter & sugar till light and fluffy
  • Add eggs one at a time
  • Mix in mashed bananas
  • Add baking soda that has been dissolved in hot milk
  • Lastly mix in sifted flour & baking powder. Dont overbeat the batter
  • Pour in into the cupcake papers in your cupcake/muffin tin
  • After 20 minutes they should be lightly brown on top and bounce back when you press on them with your finger
Ingredients for chocolate butter cream frosting:
  • 1 stick butter
  • 1/2 cup cocoa
  • 4 cups confectioner’s sugar
  • 1/4 cup milk

Steps:

  • Beat butter on high for about 30 seconds until soft
  • Add cocoa and 1 cup of sugar and beat until incorporated
  • Add half of the milk and the remainder of sugar and beat until incorporated
  • Continue to add milk until you get to the consistency you want

There are many ways to go here, in this case, I simply piped the frosting onto the cupcakes with a large star tip.

VANILLA CUPCAKES WITH FLOWERS


Please use this recipe to make 12 cupcakes. I left out the lemon zest for these cupcakes. After letting them cool off you can cover them with sugar paste.

Sunday, August 23, 2009

CAKE POPS


I got this idea from Bakerella, a brilliant and beautiful blog about baking. They looked so adorable that I just had to try them out. I didn’t put them on a stick because I didn’t have time to order them but that gives me an ideal excuse to try this again! :)

You can make a cake from scratch but you can also buy a cake mix from the shop. It depends on how much time you have and if you feel like making a cake yourself. I see no shame in the cake mixes as they can still taste quite nice.


Ingredients for cake balls:

  • Cake mix or home made cake
  • Cream cheese frostingTo be able to create balls you need to add some cream cheese frosting.

Below you have a nice recipe from the Martha Stewart site.

Ingredients for frosting:

  • 113 grams cream cheese, room temperature
  • 50 grams unsalted butter, room temperature
  • 225 grams icing sugar
  • 1/2 teaspoon vanilla extract

Steps for frosting:

  • Please cream cheese and butter in a bowl and mix until creamy
  • With the mixer on low add the sugar, making sure that all is incorporated
  • Add vanilla and blend until frosting is fluffy (1 min.)

Steps:

  • You bake your cake as usual and let it cool off
  • You crumble it with your hands or a food processor
  • Roll mixture into little balls and lay on wax paper covered cookie sheet.
  • Cover with aluminium foil or plastic wrap and chill in refrigerator for several hours or in the freezer for about 15 minutes.

Once the cake balls are chilled you can decorate them as you wish. For these ones I combined some melted with chocolate with red food colouring. For the top I coloured some white granulated sugar, I had never done that before but it doesn’t look too bad. I did cover the tops with a little bit of marmalade as it makes the sugar stick better. I just used the back of my spoon to cover the cake balls, it really doesn’t need to be much.

Tuesday, August 11, 2009

LITTLE WAFFLES

These little waffles are very dangerous; whilst I’m making them I’ll start eating them as well. I can make a chocolate cake without touching it but I can’t let these leave my kitchen without having some myself!

Ingredients:

  • 250 grams all purpose flour
  • 250 white granulated sugar
  • 80 grams vanilla sugar
  • 150 grams softened unsalted butter
  • 2 eggs
  • a pinch of salt
  • waffle iron

Steps:

  • Mix the egg yolks with the sugar and the vanilla sugar to a creamy substance, this takes at least 4-5 minutes. It needs to have a yellowy colour.
  • Add one egg after another and mix.
  • Add the flour and salt and mix until you have a smooth consistency
  • Cover it and leave it to set for an hour (I know, horrible to have to wait sooo long!!)
  • Warm up your waffle iron, butter it and put a spoonful of batter

TIP1: don’t put too much batter, I found it nicer to have little waffles than to have large ones that make a complete mess in your waffle iron.

TIP2: If you cannot buy vanilla sugar you can create it yourself. Just put some sugar in a jar and add a used vanilla pod, let that set for a few days and you’ll have lovely smelling-like-vanilla sugar.

CHOCOLATE TRUFFLES

This has to be the messiest recipe I have ever tried but the most fun to make.

I made it for Christmas last year and handed it out to my family. They loved it because it seems like you want to all that trouble whilst it is actually quite easy to make. Please do not do this when you have just cleaned your kitchen as the chocolate will get everywhere!

I did notice that whilst you roll the little balls your palms warm up so for me it was impossible to do them all at the same time, I had to stop half way and take a break.


Ingredients for 40 truffles:

  • 1/2 450g jar dulce de leche caramel toffee
  • 100g dark chocolate (70% cocoa), chopped
  • 2 x 200g bars milk chocolate, chopped
  • 142ml pot double cream
  • about 85g cocoa powder , to coat

Steps:

Make the middles first. Heat the Dulce de Leche in a pan for 1 min until warmed and runny, then stir in the chopped dark chocolate and leave to melt. Stir until smooth. Cover a dinner plate with cling film, oil the cling film well, then tip the mix onto it. Cool, and then freeze for 2 hrs or until very firm.

Put the milk chocolate into a bowl. Bring the cream to the boil in another pan, and then pour it over the chocolate. Leave for 2 mins, then add the vanilla and stir until smooth. Cool, and then chill until set.

Peel the caramel from the cling film, then snip into thumbnail-size pieces; wet kitchen scissors work best. Spread cocoa powder over a large baking tray. Take a heaped tsp of the truffle mix then, with cocoa-dusted hands, poke in a caramel chunk. Squash the mix around the caramel to seal, then roll into a ball. Put onto the tray, and then shake to coat in the cocoa. Repeat with the rest of the mix, then freeze, or chill if making less than 3 days ahead.

Tip: The recipe left me with quite a bit of caramel but I used it to fill up vanilla biscuits. You bake some simple vanilla biscuits and stick two together with some caramel you kept in the fridge, delicious!!

Thank you BBC GOOD FOOD magazine for the recipe!

Sunday, August 9, 2009

ALMOND MACAROONS


This is a lovely dessert to take to friends, it’s easy to make and presents nicely with the chocolate cover. In lots of recipes it is coconut and chocolate but I also like it in this version.

Ingredients for 20 cookies:
  • 2 egg whites
  • 225 grams milk chocolate
  • 225 grams white granulated sugar
  • 175 grams ground almonds

Steps:

  • Preheat the oven to 180°C
  • Whisk the egg whites until stiff
  • Add the sugar and ground almonds, carefully add them so you don’t over-whisk and loose the airy structure
  • Prepare a tray with parchment paper I always cover the paper with a drop of oil so the cookies slide off easily
  • bake it in the oven for 20 minutes
  • Allow them to cool and then cover with chocolate

This could get messy but I just melted some chocolate, poured it into a soup bowl and then dipped the cookies in whilst holding them with my fingers. As they rise a few centimeters I didn’t have problems to hold on to them without getting my fingers in the chocolate. I did put the cookie on its head so the chocolate side was facing upwards. That way it can dry and it won’t stick.

Keep them cool but don’t keep them in the fridge as it will influence the chocolate.

Thursday, August 6, 2009

LEMON MERENGUE PIE


This lemon meringue is great if you want to impress people. I admit, there are more exciting things than a lemon tart but with the meringue it takes it to a whole other level! You can make creative swirls so you’ll end up with a piece of art. :)


This is one of those recipes that I prepare when I know I have a bit of time on my hands. T here are three parts to this recipe; the pastry, the filling and the meringue.


Pastry
  • 250 grams of sweet biscuits
  • 100 grams unsalted butter

Steps:

  • grease a cake tin of about 24 cm diameter
  • mix the biscuits in a blender so you end up with crumbs
  • melt butter and add it to the crumbs
  • spread the mixture in the tin and push it down, you'll need to create a 2 cm border
  • put this tin in the fridge whilst you prepare the filling

Filling


  • 75 grams all purpose-flour
  • 330 grams white granulated sugar
  • 125 ml lemon juice
  • 300 ml water
  • 60 grams unsalted butter
  • 4 egg yolks
  • 2 tablespoons of lemon zest

Steps:

  • mix the flour with 1/3 of the sugar in a large bowl
  • gradually poor in the juice and mix until you have a smooth mixture
  • boil some water (a few centimeters) in a pan and put the bowl on top of the water, with the steam of the water you warm up your mixture.
  • stirr gradually until the mixture cooks and becomes thicker, make sure that it has the consistency of a hollandaise sause
  • take it off the pan and stirr in the butter, egg yolks and lemon zest
  • keep stirring until the butter is completely incorporated
  • let the mixture cool off for about 10 minutes

Meringue

  • 4 large egg whites
  • 130 grams white granulated sugar
  • 1/2 teaspoon cream of tartar

Steps:


  • Wisk together your egg whites until foamy.
  • Add the cream of tartar and beat until you have soft peaks.
  • To add the sugar you’d best do it spoon by spoon as the whites might otherwise collapse.

Compiling the pie


  • take the tin out of the fridge
  • pour in the cooled down mixture
  • spread over the meringue
  • put it into a preheated oven of 200°C for about 5 minutes,

This type of cake is best served cold so let it cool off and then keep it in refrigerated. The hardest part for me is to wait until it gets cold. I did try it once and it is not recommended to eat it warm, it just doesn’t do it justice.

Wednesday, August 5, 2009

SNOW MAN CAKE


I made this snow man cake for a charity event at work. It's a basic cake recipe, jam filling and a huge amount of white chocolate frosting .. you don't want to know the amount .. seriously!! :)
The decorations were made from marzipan .. weren't completely pleased with them but it just had to do.

You can find the recipe for the basic cake recipe when you click on the link, the recipe for the white chocolate frosting can be found below.

Ingredients for chocolate frosting:

  • 100 grams of white chocolate
  • 100 grams unsalted soft butter
  • 225 grams icing sugar
  • up to 15 ml of water

Steps

  • Melt the chocolate gently and leave to cool
  • Beat the butter, adding the sugar
  • Beat in the cooled chocolate, adding some water if necessary to meet your ideal

I went over the top and I doubled the amount of chocolate frosting, it's up to you if you do the same! :)

CELEBRATORY CAKE

I made this cake for a friend to celebrate her pregnancy. It was a basic cake recipe with a jam filling covered with coloured icing and marzipan flowers .. she couldn't resist! :)

Tuesday, August 4, 2009

BIRTHDAY CAKE

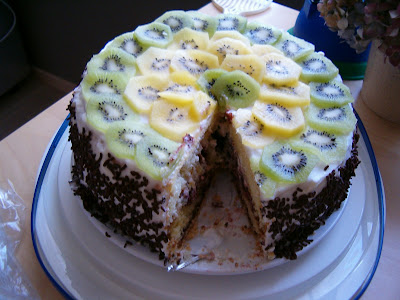
I made this cake for a birthday. This basic cake recipe is filled with a layer of cherry jam and cherries, the outside is covered with wipped cream, chocolate springles and yellow and green kiwis. You can find the recipe for the cake in the post "basic cake recipe".

Ingredients for cream:
  • 2 cups of double cream
  • 1/4 cup sugar, or to taste

Steps for cream:

  • whip the cream quickly until the cream is slightly thickened
  • add sugar
  • continue whipping the cream until it forms soft peaks. Don't whip beyond the soft-peak stage otherwise it will get stiff and curdle.
Steps for compiling cake:
  • devide the cake into two layers when it's cooled off
  • cover the bottom layer with cherry jam and cherries
  • cover with second layer
  • cover cake with whipped cream
  • cover sides with chocolate sprinkles
  • cover top with slices of kiwi

Keep the cake in the fridge to keep the cream cool.

WORKSHOP BRIDAL CAKE

I followed a workshop last May and learnt how to create this bridal cake with layers. It was the first time I got to work with sugarpaste and I loved it! Before I would always cover my cakes with wipped cream but now I've got an alternative. I love the smooth view and the ability to decorate it as you please .. in different colours!

Saturday, August 1, 2009

INTRODUCTION

When I was younger I loved watching my mother and grandmother make desserts, it would always fascinate me that by putting a few ingredients together you can create true delights. Now that I'm grown up (should be by now!) I try to do the same..

I love making desserts for other people, i
t sounds strange but I get more joy out of making them than out of eating it. There are exceptions that I will eat myself but most of the stuff I make I just give away to my loyal guinea pigs .. my family and friends. They are always available for tasting and they don't hold back on the comments! (just so you know I've never made them sick, good sign no??)

I often try new recipes, what is there to learn if you keep on making the same things? This also means that sometimes things go (completely!) wrong but that is all part of the learning process. The more you venture out in the world of baking the more you get accI basustomed to the do's and don'ts. Whenever a recipe said that you had to creme sugar and butter together I would wisk it for about a minute and think that it was sufficient .. you can imagine that I did not get the desired result! :-)).

My friends will often say "why don't you just buy that cake in the store?!" but a baking fan will agree with me that there is no greater joy than making your own!

In this blog I want to chare my joys with you and also learn from you so please don't hesistate to pop me a line. If there is one thing that I've learned it's that you NEVER stop learning because when you least expect it the cake will come out wrong! The last thing I want is for you to think that I feel that I know it all .. if only!!!!!

I base myself on my cook books which are in Dutch, English, French & Spanish so the measures can be different. Depending on where you're from you might need the following site www.bbc.co.uk/food/recipes/converter_index.shtml

Thank you for your visit and I hope you will continue to pass by!